
Starting 3D printing for custom foot orthotics requires selecting the right equipment, software, and materials, followed by establishing a consistent workflow from scanning to finished product.
- Essential equipment: 3D printer with TPU capability, foot scanner, and design software
- Recommended printer type: Continuous belt technology for uninterrupted production
- Best materials: TPU filament with 45-55 Shore A hardness for optimal flexibility
- Typical investment: $12,000-20,000 for a complete professional setup
The world of orthotic production has been revolutionized by 3D printing technology. What was once the exclusive domain of large manufacturing labs is now accessible to individual practices, clinics, and entrepreneurs. This comprehensive guide will walk you through everything you need to know to start 3D printing custom orthotics, from equipment selection to workflow optimization.
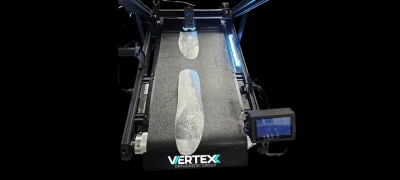
The Apex Belt V2 high-volume belt 3D printer, specifically designed for orthotic production
1. How do I choose the right 3D printer for orthotics?
Not all 3D printers are created equal when it comes to orthotic production. For professional-grade custom foot orthotics, you'll need a printer that meets specific requirements:
- Technology type: Continuous belt (conveyor) printers are ideal for orthotics as they allow for uninterrupted production and easy removal of completed parts.
- Build volume: Look for a minimum build area of 250mm x 250mm x 200mm to accommodate all orthotic sizes.
- Material compatibility: The printer must reliably handle TPU (thermoplastic polyurethane) filaments with varying shore hardness values.
- Dual extrusion: While not essential, dual extrusion capability allows for multi-density orthotics with varying support structures.
- Print speed: For a viable production workflow, look for speeds of at least 50mm/s while maintaining precision.
- Heated bed: Essential for proper adhesion of TPU filaments during printing.
Our Apex Belt V2 3D Printer was specifically designed for orthotic production with all these features, but there are other options on the market that can be adapted for this purpose with varying results.
Printer Comparison: What to Look For
| Feature | Recommended Specifications | Why It Matters |
|---|---|---|
| Print Area | At least 250 x 250 x 200mm | Accommodates all orthotic sizes including long insoles |
| Nozzle Diameter | 0.4mm - 0.6mm | Balance between detail and strength |
| Layer Resolution | 0.1mm - 0.2mm | Smooth surface finish important for comfort |
| Extruder Type | Direct drive | Better control of flexible filaments |
| Connectivity | Wi-Fi/Ethernet preferred | Remote monitoring and control |
2. What scanning equipment do I need for custom orthotics?
Before you can 3D print an orthotic, you need an accurate digital model of your patient's foot. There are several scanning technologies available:
- Handheld 3D scanners: Portable and versatile, these allow you to capture foot geometry from multiple angles.
- Pressure mapping platforms: Provide both 3D geometry and pressure distribution data for more comprehensive analysis.
- Smartphone-based scanning apps: Lower-cost entry point, though typically with reduced accuracy compared to dedicated hardware.
- Traditional casting with 3D digitization: Using plaster casts that are then digitized can be an option if you already have casting expertise.
For professional applications, we recommend dedicated foot scanning technology like our VertexScan system, which combines 3D geometry capture with pressure mapping capabilities.
Expert Tip: Scanning Best Practices
When scanning patients' feet, consistency is key to accurate orthotics. Always scan with the patient in a semi-weight-bearing position (seated with feet flat on the floor) to capture the foot in its functional position. This provides the most clinically relevant model for orthotic design.
3. What software do I need for designing 3D printed orthotics?
Specialized CAD software is essential for transforming foot scans into printable orthotic designs. While general-purpose 3D modeling software can be used, orthotic-specific software offers significant advantages:
- Automatic corrections: Built-in biomechanical tools for applying medial/lateral posting, arch height adjustments, and other clinical modifications.
- Prescription templates: Pre-configured templates for common foot conditions save significant design time.
- Direct manufacturing output: Seamless export to 3D printer slicing software in the correct orientation and format.
- Patient management: Integrated patient records and design history for easy modifications and reorders.
OrthoCAD software is specifically designed for orthotic production and integrates directly with both scanning systems and 3D printers for a seamless workflow.
Key Design Considerations
When designing orthotics for 3D printing, pay special attention to these areas:
- Shell thickness: 2.5-3.5mm is typically optimal for balance between flexibility and durability.
- Infill patterns: Gyroid or honeycomb patterns provide the best combination of strength and flexibility.
- Support structures: Design with minimal overhangs to reduce the need for supports that can affect surface finish.
- Top surface texturing: Adding slight texturing to the top surface improves grip with the sock.
- Ventilation channels: Consider adding breathability features for improved comfort in warm conditions.
4. What materials work best for 3D printed orthotics?
Material selection is critical for creating comfortable, durable, and clinically effective orthotics. TPU (thermoplastic polyurethane) has emerged as the preferred material due to its unique properties:
- Shore hardness: TPU is available in various shore hardness ratings, with 45-55A being ideal for most orthotic applications.
- Flexibility: Provides the right balance of support and comfort with excellent rebound properties.
- Durability: Resistant to fatigue, tearing, and abrasion for long-lasting orthotics.
- Processing: Printable on most direct-drive extruder systems with proper settings.
- Biocompatibility: Many medical-grade TPUs are skin-safe for extended contact.
For multi-density orthotics, combining TPU of different hardness levels or using TPU with PLA support structures can create targeted correction and support zones.
Material Handling Tips
TPU filament is hygroscopic (absorbs moisture from the air), which can affect print quality. Store unused filament in airtight containers with desiccant, and consider using a filament dryer before printing for optimal results.
5. How do I set up a complete orthotic production workflow?
Creating an efficient workflow is essential for successful orthotic production. Here's a step-by-step process that integrates all components:
- Patient assessment: Perform your clinical evaluation and biomechanical assessment as usual.
- 3D scanning: Capture the patient's foot using your scanning technology, ensuring proper positioning and weight distribution.
- Design creation: Import the scan into your orthotic design software. Apply your clinical corrections and customize the design based on the patient's needs.
- Export and slicing: Export the design to your slicing software, which prepares the 3D model for printing with appropriate settings.
- Printing: Send the file to your 3D printer. Most orthotic prints take 3-5 hours depending on size and complexity.
- Post-processing: Remove the printed orthotic, remove any support structures, and apply finishing techniques such as light sanding for comfort.
- Finishing: Add top covers or additional elements as clinically indicated. This might include metatarsal pads, posting materials, or cushioning elements.
- Dispensing and follow-up: Provide the orthotics to the patient with proper wearing instructions and schedule appropriate follow-up.
With practice, this entire process can be streamlined to deliver custom orthotics in a single day or even during a single appointment for simple cases.
Clinical Advantage
Same-day delivery of custom orthotics provides a significant competitive advantage and improves patient satisfaction. The ability to make immediate adjustments based on patient feedback also leads to better clinical outcomes compared to traditional lab-fabricated orthotics.
6. What printer settings work best for orthotic production?
Optimal print settings are crucial for creating functional, durable orthotics. Here are the key parameters to consider:
Print Speed
40-60mm/s for perimeters
Slower speeds improve detail and layer adhesion
Layer Height
0.15-0.2mm
Balance between detail and print time
Infill Percentage
90-100%
High infill needed for durability under load
Extrusion Temperature
230-240°C for TPU
Varies by specific material - check manufacturer specs
Bed Temperature
50-60°C
Critical for first layer adhesion
Print Cooling
20-40% fan speed
Minimal cooling improves layer bonding
These settings should be considered starting points and adjusted based on your specific printer, material, and design requirements. Document successful settings for future reference.
7. How do I test and refine my orthotic 3D printing process?
Continuous improvement is essential for developing expertise in 3D printed orthotics. Here's a structured approach to testing and refining your process:
- Print test patterns: Before printing full orthotics, create small test prints to verify material settings and printer calibration.
- Internal testing: Have staff members wear test orthotics before dispensing to patients to identify comfort issues.
- Controlled patient trials: Select appropriate patients for initial trials, preferably those with straightforward biomechanical needs.
- Structured feedback: Create a formal feedback process to document patient experiences and clinical outcomes.
- Iterative design: Use feedback to refine your design templates and manufacturing processes.
- Material experimentation: Test different shore hardness values and combinations to expand your therapeutic options.
Track key metrics like patient satisfaction, adjustment rate, and durability to quantify improvements in your manufacturing process.
Quality Control Checklist
Inspect every orthotic for these quality indicators before dispensing:
- Smooth top surface without layer separation
- Consistent wall thickness throughout the shell
- Proper flexibility when twisted by hand
- Symmetrical heel cups and arch contours (for bilateral orthotics)
- Accurate dimensions matching the prescription
Conclusion: Is 3D Printing Orthotics Right for Your Practice?
3D printing represents a paradigm shift in orthotic production, offering unprecedented customization, faster turnaround times, and improved patient outcomes. While the initial investment in equipment and training is significant, the long-term benefits include:
- Reduced per-unit costs compared to traditional lab fabrication
- Faster delivery times, often same-day or next-day
- Greater design freedom for addressing complex biomechanical needs
- Improved clinical outcomes through rapid iteration and adjustment
- New revenue streams from expanded orthotic product offerings
For most practices, the return on investment occurs within 9-18 months depending on patient volume. As the technology continues to evolve, 3D printing is increasingly becoming the standard of care for custom orthotic production.
Ready to start your journey into 3D printed orthotics? Contact our team for personalized equipment recommendations and workflow consultations.

About the Author
Dr. Michael Thomas is a podiatrist and orthotic specialist with over 15 years of experience in biomechanics and orthotic design. He has been utilizing 3D printing technology for orthotic production since 2018 and consults with practices transitioning to digital workflows.
Related Articles
CNC Milling vs 3D Printing: Which is Better for Custom Orthotics?
A detailed comparison of the two leading technologies for custom orthotic production.
How 3D Printing with Flexible Filaments Creates Revolutionary Custom Orthotics
Learn about the advanced materials making 3D printed orthotics more comfortable and effective.